How To Make A Split Tank: (with a bit of workshop experience already*)
- Introduction
- Before You Start
- Buying Your Wood
- Buying Your Wire
- Making The Frame
- Attaching The Mesh
- Assembling Your Split Tank
- Using Your Split Tank
This article describes the basic steps for making a Split Tank divide (and lid) for those who are regulars in the workshop and have a bit of an idea about the do’s and don’t’s of woodworking.
*If you have absolutely no idea about woodworking or have little practical knowledge with tools and carpentry (like me) – please skip to my How to Make a Split Tank – Full Version which tells you all the tips and tricks for getting it right first time. It covers everything.
___________________________________________________________________
How to Make a Split Tank – Short Version
If you are a bit handy with tools and wood already – here is the really simple version of things to take into account when making a Split Tank for your gerbils.
You are basically only making a solid frame out of wood and covering it with one or two layers of mesh.
I made mine myself using very few tools, and they have lasted ages – and have been totally safe and secure for many, many split tank introductions carried out over the years.
My Split Tanks were based on a plain shelf-less and lid-less 2 foot aquarium (61cm) – but this design is totally adaptable for any sized small shelf-less tank, or a larger tank that can be divided down to form a smaller tank size.
Depending on its current lid – you may be able to use it – or you may need to make your own lid – using exactly the same technique and supplies as below
What You Will Need
For the central divide of your tank you will need the following supplies and equipment:
- A tape measure
- A thick-leaded pencil
- A notebook or some paper
- A plain glass tank
- Untreated kiln-dried pine wood strips
- 4 x 3cm screws (wide head)
- Approx 16 (fence) staples
- A section or roll of aviary mesh or very similar
- A pair of wire cutters
- A secure clamp
- A saw (either manual or electric)
- An electric drill with a variety of small bits
1: Work Out Your Frame Size
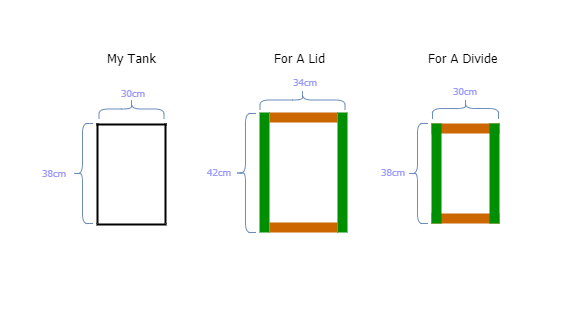
You need to work out the internal size of your tank otherwise you won’t know how much wood or wire you need to buy to complete your frame.
Start by measuring the inside height from the base up the side and to the lip of the tank – then do the same across the inside width of the tank.
If you are keeping the existing lid – it needs to sit flush with the top of your tank otherwise there will be a gap between the top of your divide and the bottom of the lid. Even an inch is enough for your gerbils to climb through and injure themselves or each other.
If you can – measure up above the tank to the base of the lid – therefore closing off that gap – OR – plan to extend the wire above the frame by a good few inches, and it can then bend over gently to meet the underside of the lid keeping it secure.
2: Calculate The Length Of Wood Needed
Basically you will need to measure and cut out the four sides for your frame – however – there is a little catch with the overall measurements.
You actually need the OUTSIDE of your frame to be the same size as the INSIDE of your tank – therefore you need to minus off the width of the wood from two of the sides. This is the distance that the two pieces of wood are going to overlap.
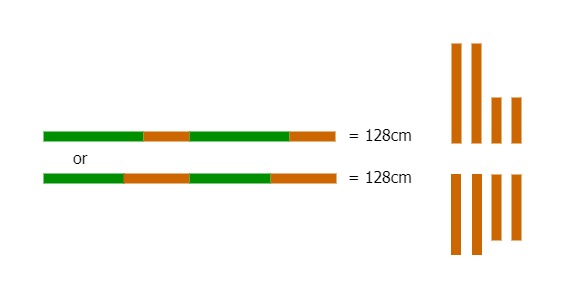
The best way to do this is to keep two of the sides the same lengths you measured them (use the longer sides at their full length ideally) – then subtract the width of these two pieces of wood off of the length need for the other shorter sides. This way when they are cut – it is obvious which ones are which side.
If you don’t subtract the width of these two sides, your divide will be too wide to fit inside your tank.
3: Choosing Your Wood
Ideally, your wood would be a natural and untreated wood like Pine – basically a slice of an actual tree.
You really want to avoid composite or glued together products as these are not really suitable for gerbil chewing and can contain all sorts of nasty chemicals.
If it is pine – it needs to be kiln-dried pine as this removes all the sap making it ‘safe’ – however, do still physically check for sap or other sticky or damaged parts before buying (as it will stick to your clothes too). If Pine isn’t available – check for other safe woods.
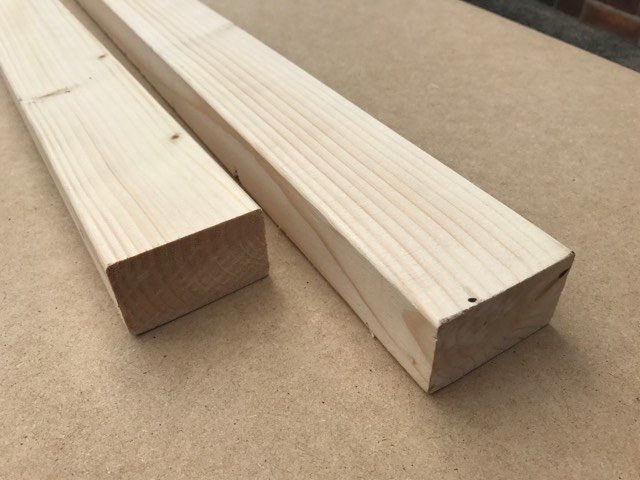
Whatever the wood – I would choose sections that are 2cm x 3cm in size. This is about the right size to make a divide that isn’t to obtrusive but is also quite sturdy – and is readily available in stores.
4: Buying Your Wire
This should be easy as I have only ever found 2 styles of suitable wire for sale – so it could just be down to one or the other. One is a sheet, and the other is a roll.
I use smaller-sized aviary wire for mine (13mm) as this size grid size has been designed to keep rodents out of aviaries – perfect for keeping gerbils apart in my split tanks.
The larger version of this aviary wire (with 1 inch squares) is too big for gerbils as they can get too much of their face and heads through it – possibly allowing enough of target for teeth on the other side.
If your required square or rectangle is smaller than the pre-made section – you are good to go. However, if you are taking this opportunity to make some lids for a few cheap tanks you picked up before – then go for the roll.
I don’t really like the idea of using anything less solid than this mesh for splits and lids and I know what a tough job they have to do – and chicken wire type wires are just too weak full stop.
5: Making The Split Tank Frame
First things first – mark out your wood. I get out my thick pencil and the sheet of paper with my measurements on it and start to mark out the sides of the frame onto the wood itself – one mark to identify which side of which frame it is and another mark to mark where to cut it.
Depending on how many frames you are making – call them Frame 1 – Side 1; and Frame 1 – Side 2 for example – as once you have all the small sections cut you won’t know which side goes with which lid or divide.
I also shade in the sections of wood that I won’t be needing to use again, or those parts with knots that I want to avoid – and I measure around them.
Double check all your marks before you cut anything – as remember – you need to reduce these lengths for your divide construction (to take off the widths of the parts of the frame themselves (see description above).
HOWEVER – if you are making a lid for a tank – you have to do the opposite.
Because you are putting this frame outside of the tank – you need to add on the widths of the sides afterwards to make it sit on the outside.
Using sinkholes with your screwdriver – determine the final size of your frame.
Once you are happy with your sizes, start sinking then screwing. You will be screwing the screw first through the flatter face of your longer side of wood (if it has one) and into the end of the other shorter side.
Both pieces of wood need to be the same width where they meet and check for straightness before and during this section.
After all 4 corners – you have your first frame completed.
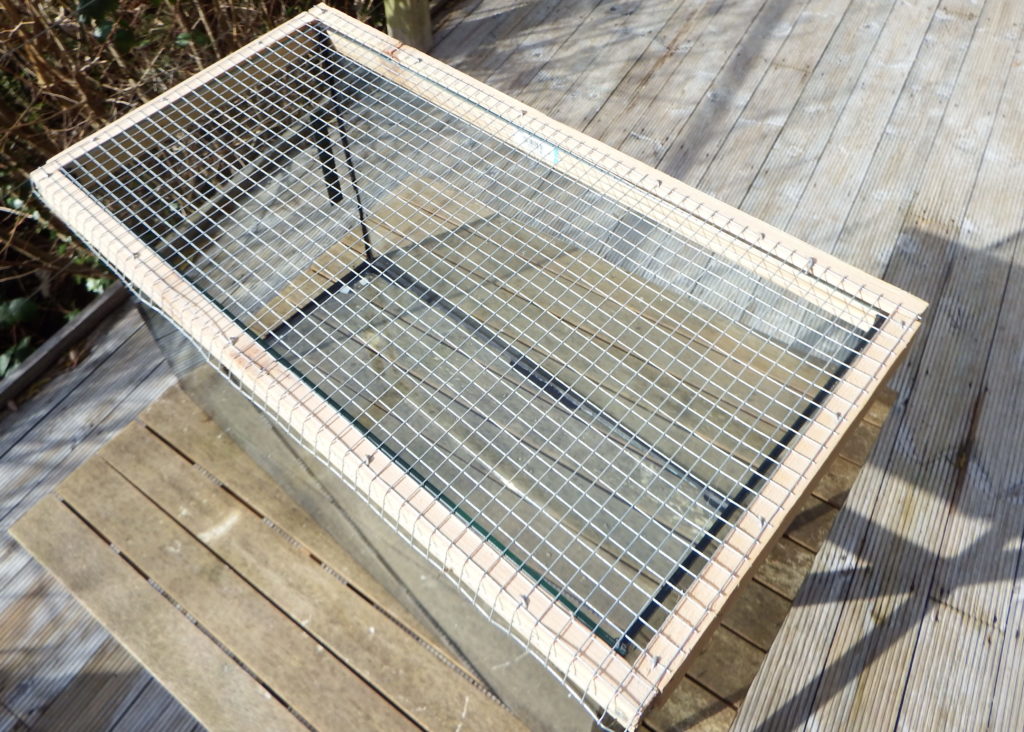
6: Attaching the Aviary Mesh
Once you are happy your frame is the right size, you can cut out your mesh.
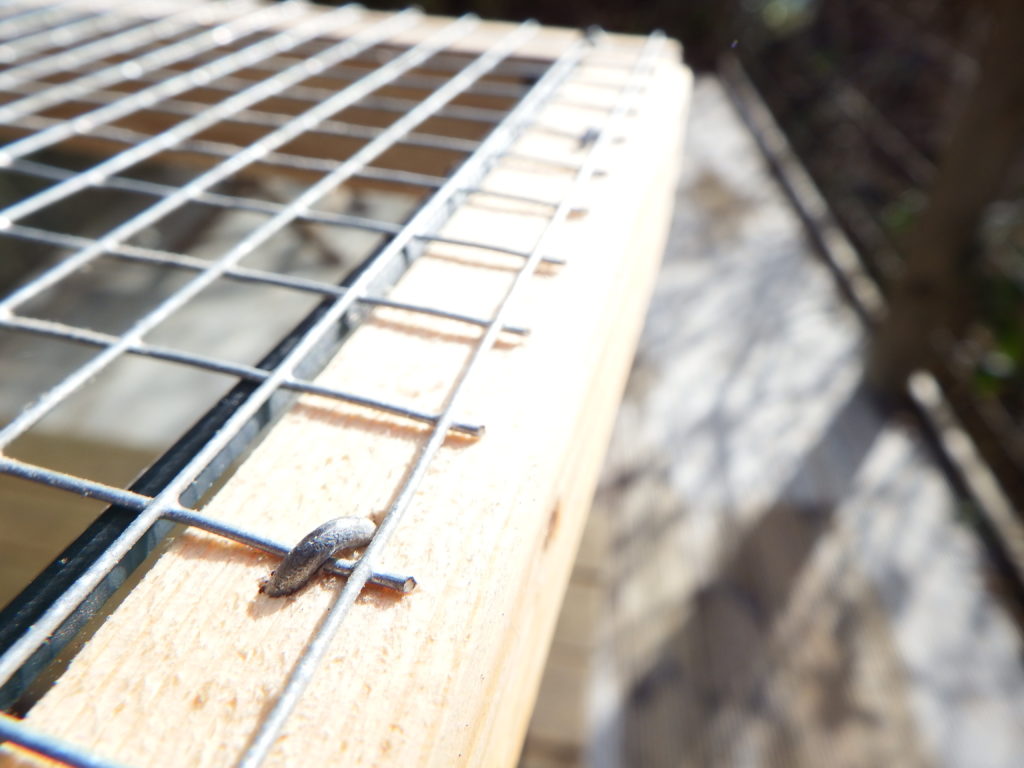
Lay your frame flat on the counter or worktop and lay the mesh over it. You are looking for hooking points.
This mesh is going to be held in place by galvanised staples that should go over two sides of one of the little squares of the mesh to stop it moving around, so you need to cut your mesh leaving plenty of places where you can nail it down most securely.
Remember – if you want to leave a few inches extra mesh as a top flap for a higher lid – you need to take his into account at this point. Make sure you leave this extra mesh the full width of the divide and coming out of the top of your divide.
Once you are happy you have cut the mesh as best you can – secure it in place with your galvanised staples – opposite corners first to prevent the mesh from bowing out.
Do the other two corners to pin it down and then – if you are happy it is straight – run several more down each side; one at the halfway point and one at each quarterway point to hold it secure.
Use the wire cutters to trim off all the excess wire outside of these nails from the sides and bottom and make sure there are no sharp edges left anywhere.
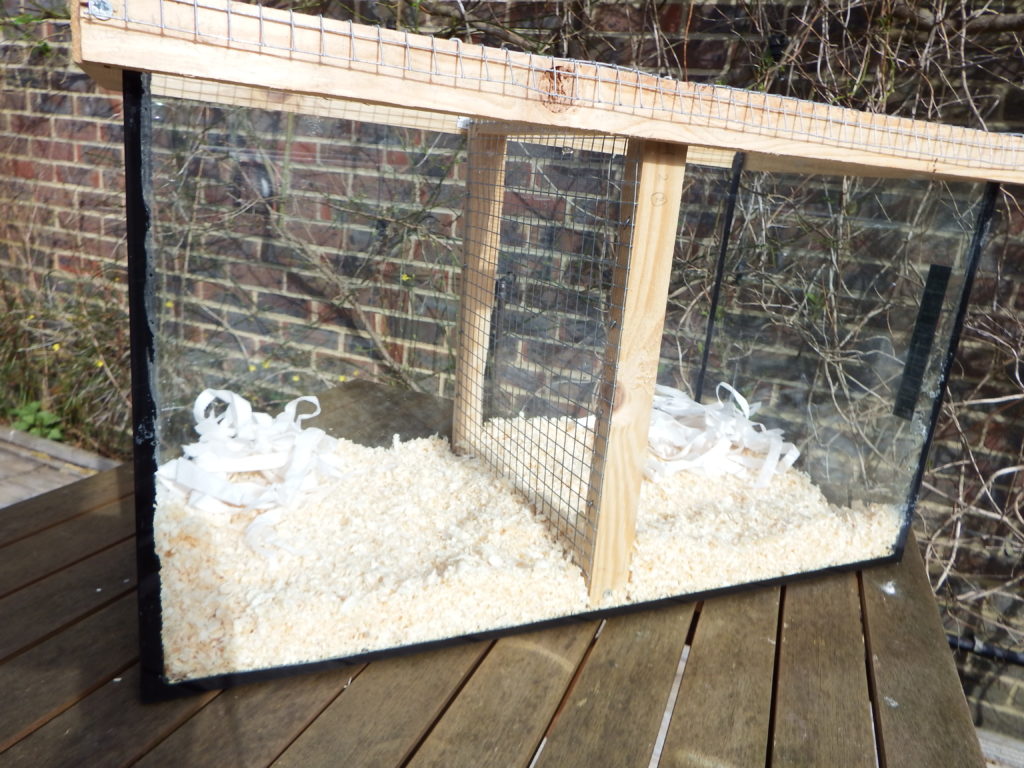
Voila – your divide is made!
If you are making a double-wired divide – turn the frame over and repeat on the other side.
This then gives you a gap in the mesh the same width as the wood (in my case this is 2cm). This way – gerbils that are overly aggressive in the split tank can’t hurt each other so making your split tank introduction safer.
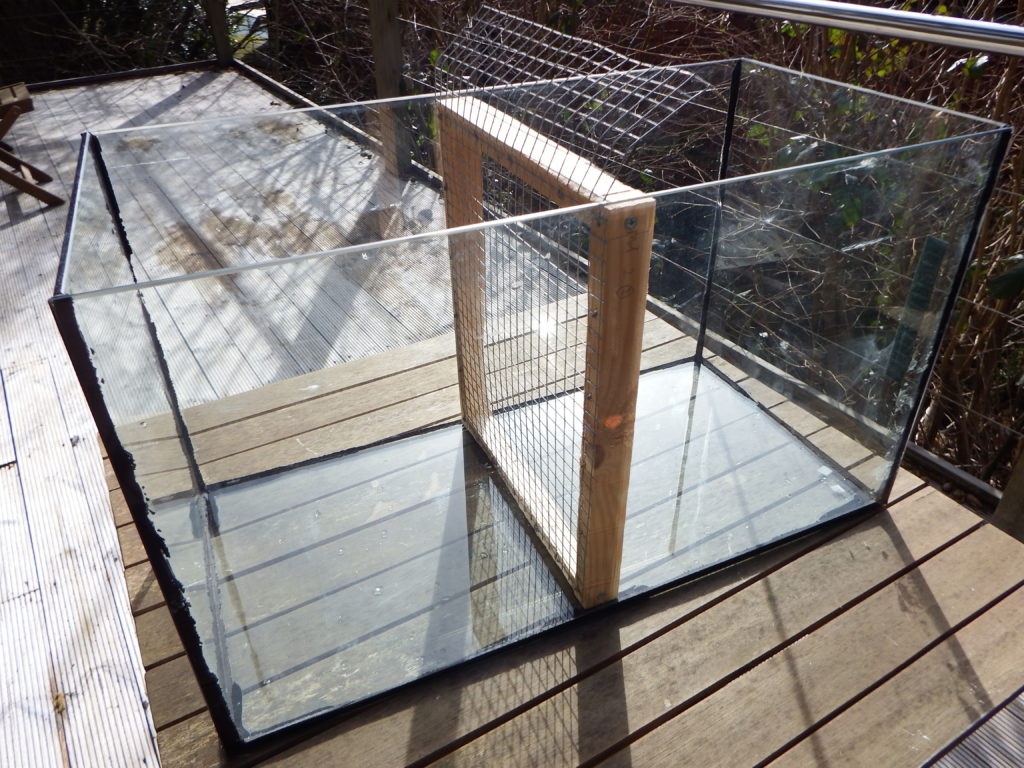
7: Assembling Your Split Tank
Nothing special is needed to assemble your split cage unless you want to do anything else to make sure you are happy it is secure.
Remember that your split tank divide needs to be easily removable and replaceable during the Introduction – so it can’t be permanently attached to the tank.
You can however, put in runners or supports if you want to hold it upright – but remember that they will be sticking out into the tank when you have done the Introduction and removed the divide. Your gerbils will be living in the un-divided split tank for at least a week (or more ideally) after they have been successfully introduced – so just make sure these sticky-out bits are dangerous on their own.
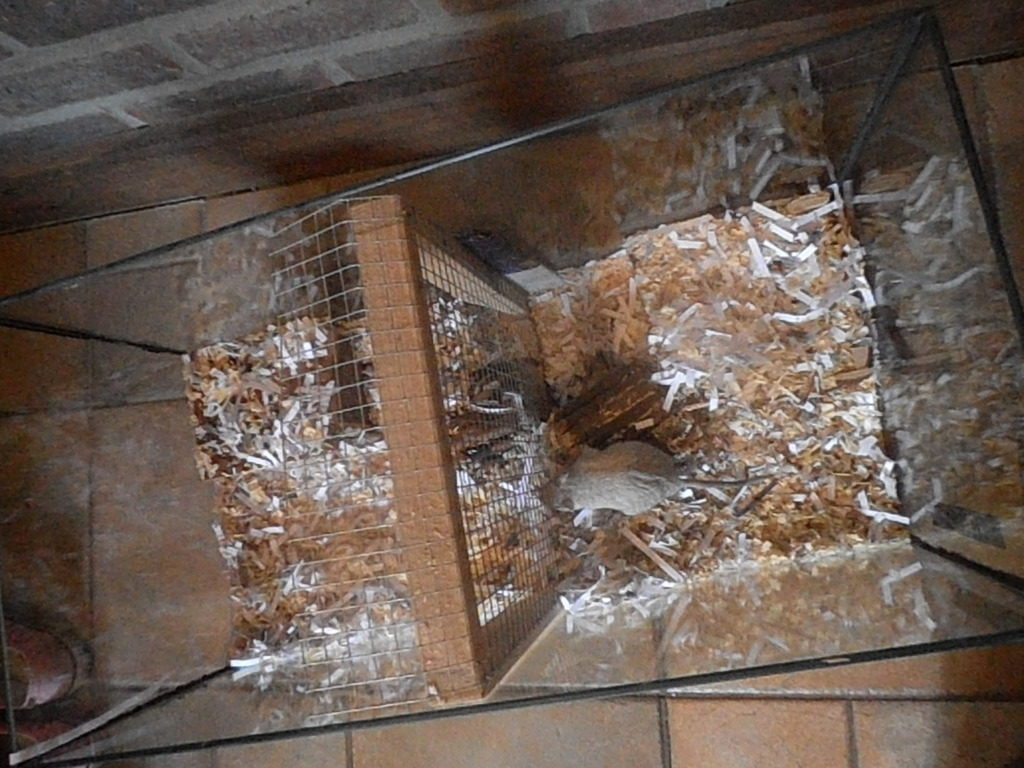
I simply slide the mesh divide into the centre of the tank and then wedge a few large pieces of cardboard down the sides if needed to make it a super tight fit.
Yeah, the gerbils will chew on them – but they chew on the divide itself as well. However, you are watching them every day, really closely, and you are swapping them around three times a day – so you can make all the adjustments you need along the way.
And alternative Split Tank Set-Up would be to have the divide in the tank diagonally in the same tank. You will have to have a much larger divide overall of course – and you will need to measure the divide differently to take into account that the corner will taper into a point that your wood cannot fit into.
However, the benefit of this way of dividing the split tank is that the divide will not need wedging in and it cannot possibly fall over. It also gives the gerbils a bit more of a surface area to interact face-to-face as well as a bit more of a running zone either side if that is what you prefer.
8: Using Your Split Tank
Finally, stick in some bedding, some food and a water bottle – pop in a gerbil on each side and secure the lid in place.
Done.
Your split tank introduction is now underway.
Good luck to all who sail in her!
If you need any tips on actually doing the Split Tank Introduction – please read my other articles including Split Tank – Top Tips and Split Tank Intros – Which Gerbils Are Best Together.